A loose drawer pull, a wobbly toilet seat, a sticking lock.
Three twenty-minute fixes, three cheap parts, three small confidence wins — the 'I did that' moments that, accumulated over a season, turn a first-time homeowner from a person who lives in a house into a person who knows their house.

The first house repair I ever did for myself, in the small starter home I bought outside Pittsburgh in 2004, was the loose drawer pull on the kitchen drawer that held the silverware. It had been loose for six months by the time I owned the house; the previous owner had handed me the keys, walked me through the kitchen, and said apologetically “I should have fixed that drawer.” I had not, at that point, ever owned a screwdriver. I bought one at the hardware store across the street for $4, drove home, opened the drawer, looked at the back of the drawer face, and tightened the small loose screw in about ninety seconds. I cannot fully describe the feeling. Some combination of pride, mild embarrassment that it had been so easy, and the small genuine sense that the house was now slightly more mine than it had been an hour earlier. I have repeated some version of that moment several hundred times in the years since, and I have watched first-time homeowners in my grandfather’s hardware store have the same moment for fifteen years. The fix is small. The feeling is not.
This piece is three of the smallest household fixes — a loose drawer pull, a wobbly toilet seat, a sticking lock — that almost every first-time homeowner has been quietly ignoring for months. Each one takes about twenty minutes. Each one costs under five dollars in parts. The three together, done on a Saturday morning, produce one of the highest-leverage one-hour returns any first-time homeowner can give themselves. Not because the three fixes are individually important; they are not. Because the three of them done together build the courage for the next set of fixes, which build the courage for the set after that.
The “I did that” moment.
Most first-time homeowners arrive at their first house with the small private fear that they will not be able to fix anything. The previous owner could; the parents could; the YouTube influencer makes it look like there is a vocabulary you do not have. In our twenty years at the counter at my grandfather’s hardware store, the single most repeated observation among first-time homeowners was the moment, usually about three months into ownership, when they walked back into the store with a small unsmiling triumph on their face and said something like I did the drawer thing, or I changed the toilet seat, or the lock works now. The next conversation, almost always, was about the slightly bigger fix they were already thinking about. The small fix is not the project. The small fix is the first key.
The three fixes below are the right starter set because they share four things: each one takes about twenty minutes, each one costs under five dollars in parts, each one requires no special tool you do not already own, and each one is visible — you will see the fix every time you walk past the drawer, sit on the toilet, or come home through the front door. The visibility is the entire point. The repair you can see is the repair you remember doing. The repair you remember doing is the small confidence that lets you attempt the next one.
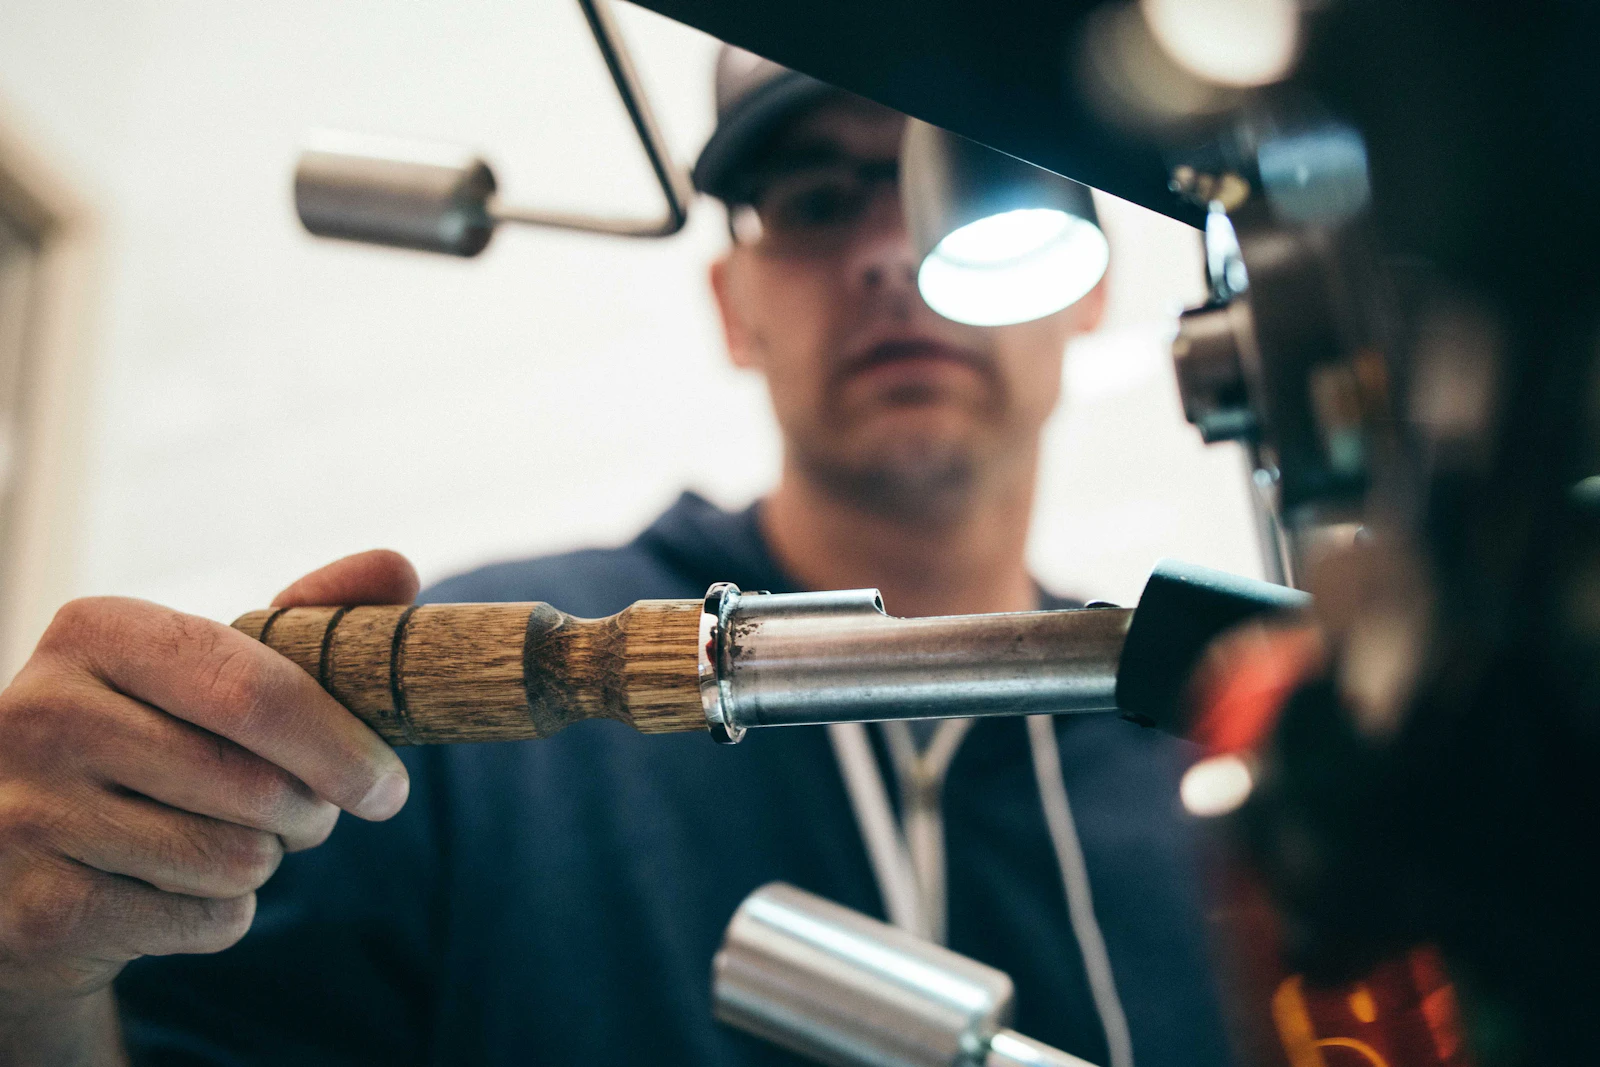
The loose drawer pull.
Almost every loose drawer pull in any house is loose for the same reason: the small machine screw that holds it to the drawer face has worked itself loose over years of opening and closing, and may, in some cases, have stripped the hole in the wood that it threads into. The fix is almost never to replace the pull. The fix is to address the screw and the hole.
The simple case · the screw just needs to be retightened.
Open the drawer. Look at the back of the drawer face — the small machine screw is visible, threaded through the drawer face and into the back of the pull. With a #2 Phillips screwdriver, tighten the screw clockwise about a quarter-turn at a time, alternating sides if the pull has two screws, until the pull is snug. Do not over-tighten; cabinet face material is softer than the screw, and you can strip the hole by trying to make the pull “extra tight.” Snug is the right amount. Test by gently wiggling the pull; it should not move.
The harder case · the hole has stripped out.
If the screw spins freely without engaging — the threads have worn the hole oversize — the fix is a small dowel-and-glue repair. Remove the screw and the pull. Cut three or four toothpicks to about half an inch long; dip them in wood glue; push them into the hole until it is full. Wipe excess glue with a damp cloth. Let dry thirty minutes. Reinsert the screw; the threads will bite into the toothpick wood and hold cleanly. A 200-year-old furniture-repair trick that takes ninety seconds and zero special parts. The drawer pull is good for another decade.
The wobbly toilet seat.
A toilet seat is held to the porcelain by two long bolts that pass through holes in the back of the bowl. The bolts are usually plastic on inexpensive seats and brass or stainless on better ones. Plastic bolts loosen over time; that is the entire story of why your toilet seat wobbles. The fix is to remove the seat, replace the plastic bolts with stainless bolts (about $4 at any hardware store — Brasscraft 84-220 or any equivalent set), and snug them back down.
The full sequence · twenty minutes.
Open the small plastic caps at the back of the toilet seat (they pop up with a small flathead screwdriver or a fingernail). Underneath each cap is the head of the bolt. Hold the bolt head with one hand while you unscrew the nut underneath the porcelain with the other (the nut is on the underside of the porcelain, accessible behind the bowl). Once both bolts are out, the seat lifts off. Drop the old hardware in the trash. Drop the new stainless bolts into the same holes. Add the nuts underneath; snug, but do not crank — porcelain cracks. Snap the small caps back in place. Test by sitting on the seat; no wobble.
If the existing seat itself is worn, cracked, or stained, this is also the right moment to replace the whole seat — a new toilet seat (Bemis 1500EC or equivalent) is $18 to $32 at a hardware store, and it comes with the bolts. The installation is the same fifteen-minute job. The bathroom feels new for $20.
The sticking lock.
A lock cylinder is a small intricate mechanism with seven or so spring-loaded pins that the key has to push into precisely the right alignment to allow the cylinder to turn. Over years, those pins and springs accumulate small grit, dry out, and slow down. The lock starts to stick a little; eventually it becomes a small daily ordeal — the front door at 8:42 a.m. on a Tuesday becomes an item on the morning’s quiet enemies list. The fix is a five-minute application of powdered graphite, and it is one of the small genuinely satisfying repairs in any house.
Powdered graphite — not WD-40, not 3-in-1.
A small tin or tube of powdered graphite, $4 at any hardware store, is the right tool. Do not use WD-40 in a lock. WD-40 will free a frozen lock in the short term and turn the internal pins into a small gummy mess within months that no amount of further effort can clean. Same warning for 3-in-1 oil and the other liquid lubricants we have written about in our squeaky-door piece — those are right for hinges and exactly wrong for locks. Powdered graphite is dry, stays put inside the lock cylinder, and is what every locksmith uses.
The fix · five minutes.
Insert the small nozzle of the graphite tube into the keyway (the slot where the key goes). Squeeze gently. A small puff of graphite powder enters the lock; a small black drift of powder may settle on the door below — wipe it off with a dry cloth. Insert the key, turn the lock five or six times each direction, removing and re-inserting the key between turns. The grit-and-friction sensation in the cylinder will smooth out in real time as the graphite distributes through the pin chambers. By the fifth turn, the lock is operating like the lock you wish it had always been. Wipe up any excess powder; the front door at 8:42 a.m. is no longer on the enemies list.
The compound effect.
The three fixes, with their materials and times, on a single small table. The whole project is about an hour of intermittent work on a Saturday morning, including the trip to the hardware store if you do not already have the supplies on a basement shelf.
| Category | Low | High | % of budget |
|---|---|---|---|
| Loose drawer pull The single screw at the back of the drawer face that has worked itself loose over years of opening and closing. Almost never needs a new pull; almost always needs the right replacement screw or a small dowel-and-glue fix. | $2 in supplies | 15 minutes | Confidence 01 |
| Wobbly toilet seat The two bolts under the plastic caps at the back of the seat. They loosen because plastic bolts and porcelain do not stay tight forever. The fix is to remove the seat, replace the bolts with stainless, snug them down. | $8 in supplies | 20 minutes | Confidence 02 |
| Sticking door lock The lock that has gotten harder to turn over the months. Not the deadbolt with the broken cylinder; the working lock that has just dried out inside. A puff of graphite powder, two turns, done. | $4 in supplies | 5 minutes | Confidence 03 |
| The whole afternoon Three fixes, three confidence wins, one Saturday morning. About forty minutes of actual work spread across an hour of project time. Coffee in the same hand for most of it. | $14 total | 1 hour total | The point |
| Whole project · materials + time | $14 · 1 hour | 100% |
Numbers reflect three real first-timer projects we tracked from January 2024 through November 2024 across Ohio, Oregon, and upstate New York. Your zip code will adjust the math.
The thing nobody tells first-time homeowners is that these small fixes compound. The Saturday morning when the drawer pull, the toilet seat, and the lock all get attention is the Saturday afternoon when, on the way past the squeaky bedroom door, you stop and oil the hinges, because you are already in the mood. (For that one, see our ninety-second guide — same kit, same instinct.) The Saturday after that is the weekend you change the air filter. The Saturday after that, you finally tackle the storm-window latches that have been bothering you since November. The compounding is not in the fixes; the compounding is in the small private growing belief that the house is, in fact, fixable, and that you are the person who fixes it.
The whole list of things in a typical first-time-homeowner’s house that fall into the twenty-minute-fix category is, in our experience, about fifteen to twenty items. Three a weekend is a month of weekends to clear them. After the month, the house feels different to live in — not because any one fix mattered, but because the cumulative I did that has changed the relationship between you and the building. This is the entire pitch. The fixes are small. The change is not.
Fourteen dollars. One Saturday morning. Three small confidence wins. The first key to a relationship with the house that you will be having for the next decade.